For those of you that have kids and think you are hip, you will love this site and all that it offers...
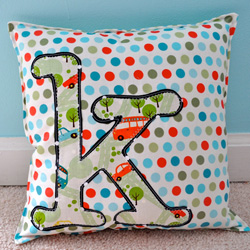
I just want this pillow... with a "W" of course... If only I didn't have to ship my sewing machine back to the States...
Courtesy of www.ohmyhandmade.com....
Tutorial: monogram pillowFriday, March 5, 2010 |
by Crystal Johnsen of Little Bit Funky
 For the first tutorial here at Oh My! Handmade Goodness, I’m going to show you how to make a cute monogram pillow.
You will need:
* card stock
* fabric
* stuffing for the pillow
* a sewing machine

1. Print your template onto card stock. I used 850 pt. American Typewriter font.
2. Cut it out.
3. Trace your letter onto the smooth side of your Wonder Under. Be sure to trace it backwards.

4. Iron your Wonder Under onto the wrong side of your fabric.
5. Cut it out.
6. Now iron your letter onto some contrasting fabric. Be sure to remove the paper backing.

7. Trim around the letter to make a nice border.
8. Cut out a 13-inch square for the front of the pillow and another for the back. Go crazy with fabric combos – there are no wrong combinations.
9. Pin your letter onto the front of your pillow. I like to put them off center so I don’t have to worry about being centered, but place it wherever it makes you happy.

10. First use a long straight stitch to sew the letter onto the pillow face on the outer fabric.
11. Then, sew around the letter again on the inner fabric using a zig-zag stitch.
12. Line up your two pillow sides, right sides together, and sew all around the sides. Leave a 5-6 inch opening. Feel free to pin. (I hate pinning, so I avoid it whenever I can.)

13. Use a 1/4-inch seam all around. Turn your pillow right side out and push out the corners with dull scissors or a chopstick.
14. Starting at the left side of your opening, stitch all around the pillow again. Don’t sew the opening closed, stop just before you get to the opening. (You can iron before this step, I just hate ironing as much as pinning.)
15. You will now have a nice little edge around your pillow. Now stuff it as full as you’d like.

16. Now you CAN sew the opening closed by hand. But guess what? I hate that too, so I sew all my pillow openings closed by machine. It requires you to smoosh down the pillow, line up the sewing foot with your last 1/4-inch stitching and sew it up. This step WOULD be a little easier if you had ironed, but that never gets me to iron. Be sure to back stitch at the beginning and the end.
Ta-da! Cuteness anyone would love.
Cheers,
WMMc

No comments:
Post a Comment